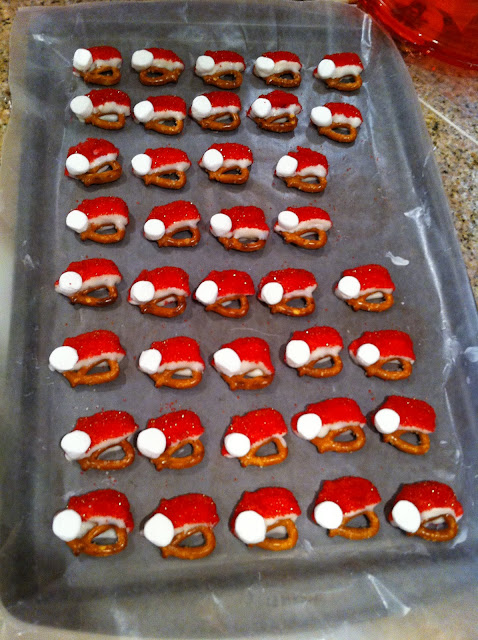
I made these for a secret santa party and thought they were cute enough to share!
Supplies:
1 bag of mini pretzel twists
1 bag of mini marshmallows
Red sugar
white almond bark chocolate
1. Melt the white almond barkchocolate either in a chocolate melter or however the directions on the package say to
2. Dip the pretzel halfway into the melted chocolate
3. Dip the pretzel into the red sugar crystals, leaving a little of the white showing to look like a santa hat. Put the pretzel on wax paper.
4. Cut the mini marshmallows in half, I used kitchen scissors. Dip the stirring spoon into the chocolate and take the marshmallow half and place on back of spoon to get some of the chocolate onto it in a less messy way. Then adhere the marshmallow on the side of the pretzel. Allow the chocolate to set before removing from the wax paper.
Wednesday, December 14, 2011
Tuesday, December 13, 2011
String Art Tutorial (yayyy!)
Hey ya’ll!
So I’m sure all of you out there are just as much addicted to Pinterest as I am, and may have seen the artwork that has inspired my tutorial today! Now, if you don’t know what I’m referring to, here’s the link to person selling their work on etsy. (making your own will cost you about $10 or so.. just saying!)
http://www.etsy.com/listing/82924417/louisiana-state-university-love
http://www.etsy.com/listing/82924417/louisiana-state-university-love
 |
| Don't mind the white string and spray paint, along with the pink paint... I used this for a different project I was doing.. but the supplies still stay the same |
Supplies needed:
1 12 inch by 12 inch piece of wood
1 ruler
white spray paint (optional)
some type of painters tape (I used Scotch)
acrylic paint to paint the board
1 paintbrush
a pair of scissors
a pair of needle nose pliers
a hammer
nails
a pencil or marker
some notebook paper
sandpaper
string
Here’s the thread I bought from Hobby Lobby
http://shop.hobbylobby.com/products/lizbeth-thread-261107/
I got the wood from Lowes for about $5 for 4 of them.. just go to the wood section and ask them to show you the 2 x 2 wooden boards and have them to cut it into 4, 1 x 1 boards
 |
| So go ahead and sand the wood...preferably outside or something.. but this sandpaper block made it so much easier and faster to sand with |
So for the South Carolina state outline, I Google imaged “South Carolina state outline” and I picked this one to use for the outline:
& then clicked this one to see where exactly Columbia was in Richland county
THIS
link below is PERFECT for the outlines (I found this after I found the
original one I used)! Once you click on the state, you can play with the
magnification when it brings it up to print!
http://www.eduplace.com/ss/maps/states.html
Now, I didn't print the outline because it does not print out to the size I need to fit the 1 x 1 wooden board I used, so I like to use notebook paper because it's not as thick as computer paper to trace with. I place the paper in the top left hand corner to make sure that the image is traced straight and I also use the lines on the paper to help with measurements.
 |
| As you can see, the paper isn't wide enough, so I had to add to it to fit the entire state |
 |
| I then taped the papers together and added a piece of paper (it was scrap from cutting the other paper earlier) to the top right so the paper will be wider to fit the state |

 |
| This is the heart I used http://www.freeclipartnow.com/d/25689-1/heart.jpg |
 |
| Then I just drew a line to cut off the excess paper |
 |
 |
| Note: Do not hammer your nails as close together as mine are here.. try about the space between each line on the paper between each nail, but a little less.. |
 |
| I used the pliers to pull the nail out instead of the back of the hammer because sometimes it gets too cramped |
 |
| finished! now start tearing off the paper... |
 |
| My dog, Leila, watching all the action |
 |
| tie the string in a knot, like so. |
 |
| Here’s the thread I bought from Hobby Lobby http://shop.hobbylobby.com/products/lizbeth-thread-261107/ |
 |
| when you're ready to switch to another nail in the heart.. follow this step and the next |
 |
| keep doing this until you work your way back around to the starting point |
 |
| at the end, you overlap the beginning nail like so |
 |
| then take the string and wrap it around the nail a few times |
 |
| then use the beginning string to tie a knot on the ending string..knot a few times.. then cut off |
 |
| To hide the knot, I took some clear nail polish and stuck it to the nail under the group of string.. I'm sure there are other ways you might find that are easier |
 |
| YAY DONE!!!!!! |
Subscribe to:
Comments (Atom)


